Siding is one of the most attractive and important parts of a home. Most people think of installing the siding in a horizontal position instead of any other, but those who want to get a more eye catching design and exciting look to their homes will think about vertical vinyl siding. They are designed in a vertical position and demand proper and correct methods for installation to give a professional appearance. So, let’s find the right method on how to install vertical vinyl siding.
- Planning For Vertical Vinyl Siding Installation
- Equipment and Tools For Vertical Vinyl Siding Installation
- How To Install Vertical Vinyl Siding – Complete Guide
- Snap Chalk Reel
- Vertical Vinyl Siding Starter Strip vs Wider Starter Strip
- Inside Corner Posts Installation : How To Install Vertical Vinyl Siding
- Splice Inside Corner Posts
- Installation of Outside Corner Posts
- Splice Outside Corner Posts
- Outside Corner Posts Capping
- J-Channel Vinyl Siding Installation
- First Vertical Vinyl Siding Panel Installation
- Overlapping Joints
- Fit Vertical Vinyl Siding Under Windows
- Cut Exterior Siding to Fit
- Cut the Vinyl Siding Around Window
- Fit Vinyl Siding Over Windows
- Siding Under Eaves
- Fit Top Siding Panel
- Snap-Lock Top Vinyl Panel
- Top Panel Installation
- Top Course Finishing Under Gable
- Fix Mistakes With Zip Tool: How To Install Vertical Vinyl Siding
- Conclusion: How To Install Vertical Vinyl Siding
Planning For Vertical Vinyl Siding Installation
When we say preparation for installation it means collecting all the necessary equipment and tools, taking proper measurements of all needed things like walls, windows, and doors.
Equipment and Tools For Vertical Vinyl Siding Installation
When it comes to the right equipment, there is a long list of items which you need for installing vertical vinyl siding. Regarding fasteners you need corrosion-resistant nails and screws. The necessary tools include Hammer, Tape Measure, Tin Snips, Chalk Line, Square, Utility Knife, Level, Snaplock Punch, Shears, and Three-Hole Punch.
Power circular saw is the only required power tool. You also need ladders and scaffolds for pepper and easy installation. Some special tools include Nail slot punch, Snap lock punch, Trim nail punch, and Zip tool for error corrections.
How To Install Vertical Vinyl Siding – Complete Guide
Installing vertical vinyl siding in a professional way isn’t easy but if you properly follow the installation guide then no one can stop you from doing the best.
Snap Chalk Reel
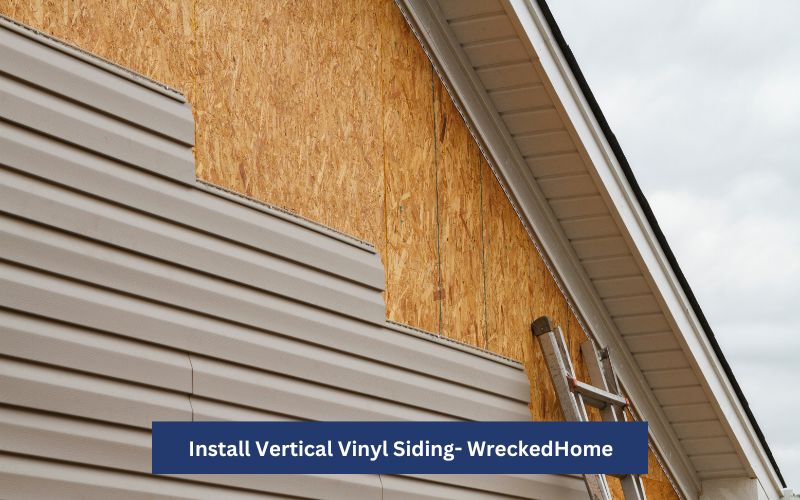
Does your home have a previous siding or sheathing? If yes, the process will be easy. This step is the base of installing vertical vinyl siding because from here the process gets its starting.
Firstly, find the lowest corner of it. Take a nail and partly drive it into the wall but keep it 1-1/2 inches higher than the lowest corner. Now you have to stretch a chalk line but remember it should be leveled and between from the nail we partly drive to a similar one which is at the next corner.
Now, snap the chalk line carefully against the wall and keep it straight. Make sure it leaves a clear mark on the wall. Now, you have to repeat the same process on all sides of home until the entire house is completed.
Vertical Vinyl Siding Starter Strip vs Wider Starter Strip
A starter strip is a vinyl siding piece which is installed at the wall’s bottom to give foundation to the first course of siding. One of the aims of installing it is protecting the sheathing from moisture and for that you have to install it at least 1 inch below the foundation’s top. As it prevents water from wicking up the wall it saves sheathing from damage.
Overall, you can get two sizes of starter strips: 2-1/2 inches and 3-1/2 inches. The wider one offers more protection for the sheathing and is best to install in houses where high winds come or where you have to struggle with a lot of rain or snow. The wider one also looks more professional siding than the narrower one. Though it is a little bit pricey and you can choose the latter one if you are on a budget.
Snap the chalk line, cut the starter strip in length as much as you need and align its top edge with the chalk line. Leave a space for corner posts depending on their type. Nail the strip to wall every 12 inches.
On uneven wall surfaces, shim out strip to prevent wavy appearance at the end. You can avoid the situation by placing a thin piece of metal or wood under an uneven strip.
You have to drive in nails to remove excess play in strip but not too tightly to restrict all movement. Make it loose enough to give space to starter strip to expand and contract in need, like offering 1/4-inch space between strips to prevent cracking and warping the siding.
Inside Corner Posts Installation : How To Install Vertical Vinyl Siding
You have to install vinyl inside corner posts in the already existing corners. Remember to cut the posts to length in such a way that they extend 3/4 inch below starter strip’s bottom. If you have planned to use vinyl soffit, you have to leave space below the eaves’ underside for its installation accessories and that space also depends upon it.
You have to set corner posts but remember to make them in right place and secure them by nailing them at the top of the adjoining walls. You have to start placing nails from top position, which is closest to post’s top, of the uppermost nailing slots. Now hang the posts on these nails. After that, nail the rest of the posts but leave the space of 8 to 12 inches to allow expansion and contraction due to fluctuations in temperature in the center of the nail slots. To avoid damage, don’t nail the posts too tightly.
Splice Inside Corner Posts
First you have to trim the posts so cut 1 inch from the end of each post, but don’t the outer side of the upper part of lower post. Now, take the upper post and place it on top of lower one. Remember to hang over 3/4 inch of upper post over the lower in order to give 1/4 inch gap for expansion.
Installation of Outside Corner Posts
When it comes to installing outside corner posts you have to spare a 1/4-inch gap between the eaves and the top of post. Then you have to cut posts so they can easily extend past the starter strip bottom by 3/4 inch.
Next is nailing posts to the adjoining walls by driving nails in the upper slot’s top position on each side and rest them in the center of the nail slots but leaving a space of 8 to 12 inches between them for safety.
Splice Outside Corner Posts
You have to cut nailing flanges by 1 inch and upper post’s bottom part, which contains the receiving channel stops. Then you have to place 3/4 inch of upper post on top of lower post, but remember to leave a 1/4 inch gap for expansion.
Outside Corner Posts Capping
If you are going to install vinyl corner posts you have to keep in mind about pests who love to reside in these posts like bees, mice, etc. Capping the posts is the best way to prevent such situations. Take the posts and cut a few inches from their J-channel portion.
After folding the remaining flaps you need a hammer to gently tap them to make a crease. You have to make V cuts in the flaps in order to get tight fit of posts against the wall. The posts need warmth because in cold, they get cracked so it’s better to warm them in the sun or take them in your house before capping them.
J-Channel Vinyl Siding Installation
Next is the installation of J-channel which you have to put around your house’s window or door from all sides. For installation, you have to flush it against the casing and drive the nail to fix it in the wall but drive gently.
First cut bottom J-channel so it flushes with the window casing sides. Then install the side one in such a way that it is even with the bottom one and the top side of the window casing. To stop water from chasing J channels, you have to cut and fold a tab in the lower face of it. Cut the top J-channel and install it to outer side of side one. You have to cut it further and bend drain tab.
Keep the length of the bottom J-channel in such a way that each end of it extends past the side casing by width of J-channel face.
In the back of each end of bottom J-channel, make a 3/4-inch V cut so it will fit snugly against the side casing. Now install this J channel with the help of driving nails and screws.
In the bottom of side J-channel, make a 3/4-inch V cut and bend the tabs to create an appearance of false fully mitered after the both J-channels installation.
First Vertical Vinyl Siding Panel Installation
Now it is time for the installation of vertical vinyl siding, for that, take the panel and snap its bottom into starter strip. Drive the nail to firmly place panel on wall. Remember to start installing vertical vinyl siding in the back corner of your house and work your way towards the front.
Spare 1/4-inch gap between the corner post and panel to prevent damage during expansion and contraction. Moreover, keep your vertical vinyl siding away from high-traffic areas like sidewalks and doors.
Overlapping Joints
Panels have factory pre-notched (V shape) cutouts and each panel should be overlapped on these cutouts by 1 to 1-1/4 inches. Remember to drive nail at least 10 inches from each panel’s end. This overlapping not only seals out water and prevents leaks but also gives a neat finish look.
Fit Vertical Vinyl Siding Under Windows
While installing vertical vinyl siding, when you need to install panel under window, you have to cut it according to the need. Thus, measure the window’s width and add 1/4-inch as clearance on both sides of panel.
Take the scrap piece and lock it into panel, which is below window. Now, mark window opening height in addition to 0.25 inches clearance. You can use this scrap piece while marking horizontal cuts on the vertical vinyl siding panel.
Cut Exterior Siding to Fit
Then you have to make vertical cuts on panel for which you can use tin snips or saw whatever is available. Make a horizontal shallow cut and remove a section by using a utility knife.
Cut the Vinyl Siding Around Window
Next is the installation of under-sill trim which should be as wide as the width of window, and join it to its casing. As furring is essential, you have to punch the panel. In order to punch the panel and create raised lugs on panels 0.25 or 1/4 inches below the cut edge, 6 inches apart, you have to use snap lock punch. The lugs need to snap into under-sill trim so remember that they should face outward.
Fit Vinyl Siding Over Windows
Repeat the steps of measuring and cutting panels for fitting siding under the window. Remember as this is over the window step, don’t cut the top but the lower portion. After checking both sides for correct fitting, install the panel, drop the siding one into J-channel which is at the window’s top and attach it.
Siding Under Eaves
Join the under-sill trim to sidewall by driving nails and then flush it with your house’s eave. To maintain the top siding panel pitch, the splicing of furring strips is required especially of more than one length under the eave.
Fit Top Siding Panel
When you cut the top panel remember to do it after proper measurement. You can measure its length by measuring the space between under-sill trim’s top and lock of panel below and excluding 1/4 inch from the final size. Now cut the top siding panel equal to this length.
Snap-Lock Top Vinyl Panel
Now insert the panel you have cut before into trim. Draw correct line on panel at the point of the meeting. At the top of this line, punch panel by using snap lock punch tool at the interval of 6 inches. Remember to check that the raised lugs should be on the outside face.
Top Panel Installation
You have to lock the bottom edge of the panel into groove of panel below. After its locking, push the panel’s top position into under-sill trim. This locking is known as a ‘lock joint’ and raised slots are part of it which are located at both edges of panel. They keep the panels locked by firmly catching and holding them together. Just remember that you shouldn’t drive nails through the front side of siding instead use screws and nails from the back side.
Visit our store for 10% off our Tools here.
Top Course Finishing Under Gable
First, you have to drive nails to join the j-channel and sidewall with a gable. If you want to finish gable on one side and in need of J-channel of one particular length, you are in a dire need of splice. But remember that it should be made with a piece of J-channel of equal length to the overlap between J-channel pieces.
Cutting panels while keeping a proper angle in mind, you can make cutting pattern with the help of two scrap pieces by overlapping scrap siding piece with piece of below siding. You have to hold the other piece at top position but against the gable.
Now it’s time to cut the bottom piece after marking line and use it as a pattern guide to cut panels according to it so they can fit along Gable’s one side. Do the same process for other sides. You have to lock pre-cut siding panel into the siding one which is below and then slide the siding panel into J-channel. Continue using it until the installation of all siding panels.
Fix Mistakes With Zip Tool: How To Install Vertical Vinyl Siding
Once the process is completed, take a look to see any faults or things still remaining to do. By chance, if you make mistake as it may happen with anyone while installing vertical vinyl siding don’t stress out because it comes with easy solution. You just need a zip tool to remove the wrong and faulty piece of siding, take the tool, slide it under siding edge, hook the locking one, and once you pull down and move it across the siding, you will see the nailing hem below the piece. So, just remove the piece immediately.
Conclusion: How To Install Vertical Vinyl Siding
We have discussed a complete guide on how to install Vertical vinyl siding in the right way. If you follow each step of our guide carefully you will get professional results at the end. So, why wait? Let’s start the installing and giving a new and eye catching look to your home walls.
For any repairs, installations, builds, or questions; We recommend you to hire a professional. Find A Pro Near You Here!


