The fence is a crucial part of your property, especially on ranches and farms. It ensures that your livestock remains on your property and predators remain out of it. It also adds an aesthetic appeal to your property, enhancing its beauty.
In installing a fence, the biggest challenge is fence stretching. You need to stretch the fence correctly so that it remains in its place and has a long life. The well-installed fence can last for almost 25 years.
You should know how to do proper fence stretching because if the wire is too stretched or tight, it will get damaged. If it is too loose, it will sag.
So, to help you with this tricky part, the Wrecked Home team is at your service. We aim to help all homeowners with different DIY projects. You can trust us.
In this article, we will tell you how to do proper fence stretching.
Step-by-Step Guide to Proper Fence Stretching
There are different steps that you should follow if you want a properly installed fence, and want to stretch it properly.
Use the Right Tools
If you don’t have the proper tools for fence stretching, you are never going to achieve your goal.
The essential tools you need are listed below.
- Fence Posts: There are different types of posts which are either made of wood or steel. Each type serves different purposes in your fence project so you should know about all of them. The one is the brace post which supports the whole weight of your fence project. T posts held your fence vertically. Boss posts give ideal support to the fence when it is on uneven ground.
- Drill and Drill Bit: You need a ⅜ inches drill bit to drill holes for your dummy brace system.
- Brace Pins: For this project, we recommend you ⅜ inch by 10-inch brace pins. They are used to hold your posts in place.
- Scrap Wood Pieces: You also need extra pieces of wood boards. It will shim your dummy braces.
- Post Hole Digger: It will help you in setting or resetting any fence post.
- Tamping Tools and Driver: You need these tools to pack the dust around the post firmly.
- Field Fencing: You need this tool for the fence project. Mostly, it comes in roll shape. While buying it, you should make sure that it covers the whole area.
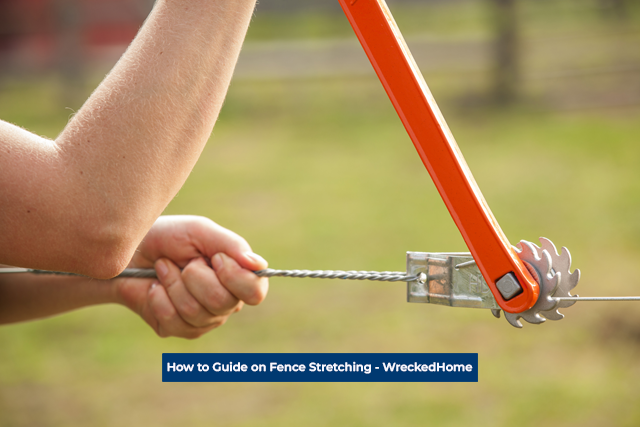
- Come Along: It is needed to bring tension to your fence, causing fence stretching.
- Fence Stretcher Bar: It has steel bars and bolts that you can clamp down on the wires. It will push the mesh evenly.
- Measuring Wheel: It will help you to install the posts at an equal distance. This step is important for the proper installation of a fence.
- Marking Paint: It is also important that your posts and field fence remain in a straight line. You can use marking paint to mark the lines.
- Fence Pliers: They serve different purposes such as cutting, stretching, or splicing wire. It is also used to hammer or pull staples.
- Staples: They appear to be a nail bent in a U-shape with points on both ends. It should range in size from ¾ inch to two inches.
In addition to these, you need work gloves and a fence tool. It is for your safety and to make your work easy.
Now, that you have all the tools, we are going to the next step.
Make a Layout
You need to complete proper planning before fence stretching. You should measure your property with the help of a measuring wheel. After that, use marking paint to mark the points where you want to install your posts.
Unroll the Fence
Now, you need to unroll your wire fence. If it is only a few feet long, then you can use a steel post. It will make your work easy and safe.
But, what will you do if it is hundreds or thousands of feet long? Well, there is a solution to it too.
You can use an un-roller that comes as a tractor attachment. Through this method, you can unroll the whole fence in a matter of a few minutes. Also, make sure to put a heavy object on the wire so that it doesn’t roll back.
In the end, where there is only a small piece of wire left to unroll, you can take the bundle and move toward the first post.
Now, tie the unrolled part of the wire to the first post. Then, move toward the next post while you are unrolling the remaining part of the fence.
In this way, you can cut the pieces of the wire accordingly.
Visit our store for 10% off our Tools here.
Tying the Wire to the T-Post
You need to cut out the knot in each row along the width of the wired fence. In this way, you must cut the long piece of wire to wrap around the post.
Tip: You should cut two to three knots. It will be of enough length and size.
Now, twist the loose end of the wire with the help of a wire twister. You need to tie off several horizontal wires in the middle of the fence. Make sure that it reaches the end post.
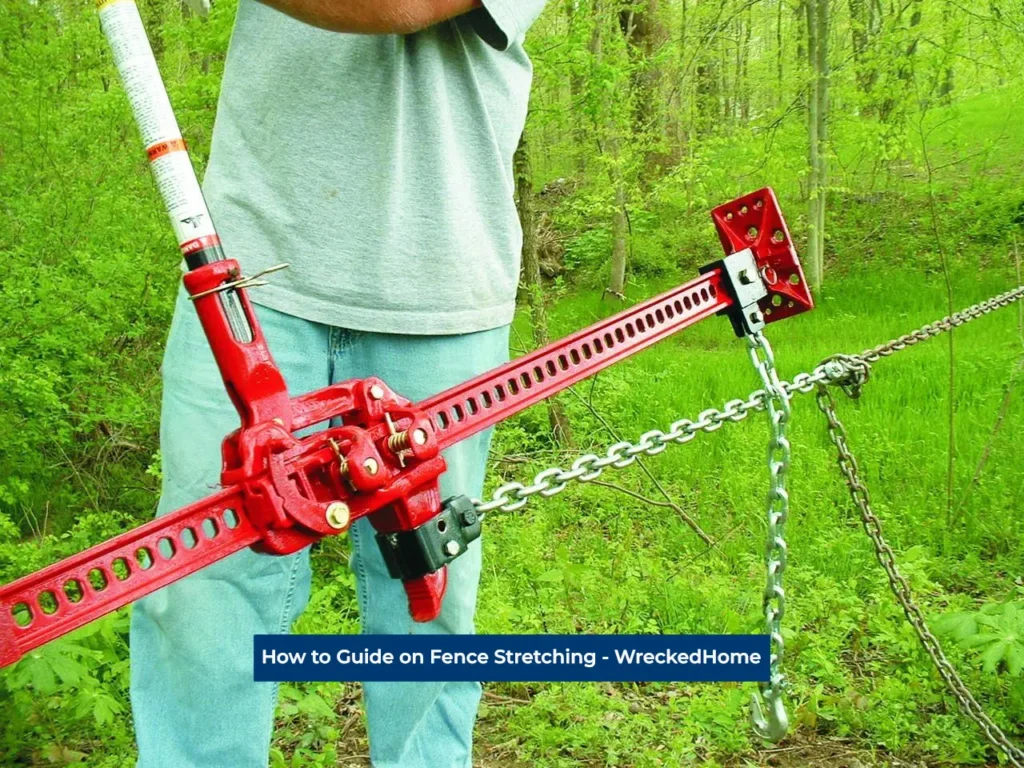
Fence Stretching
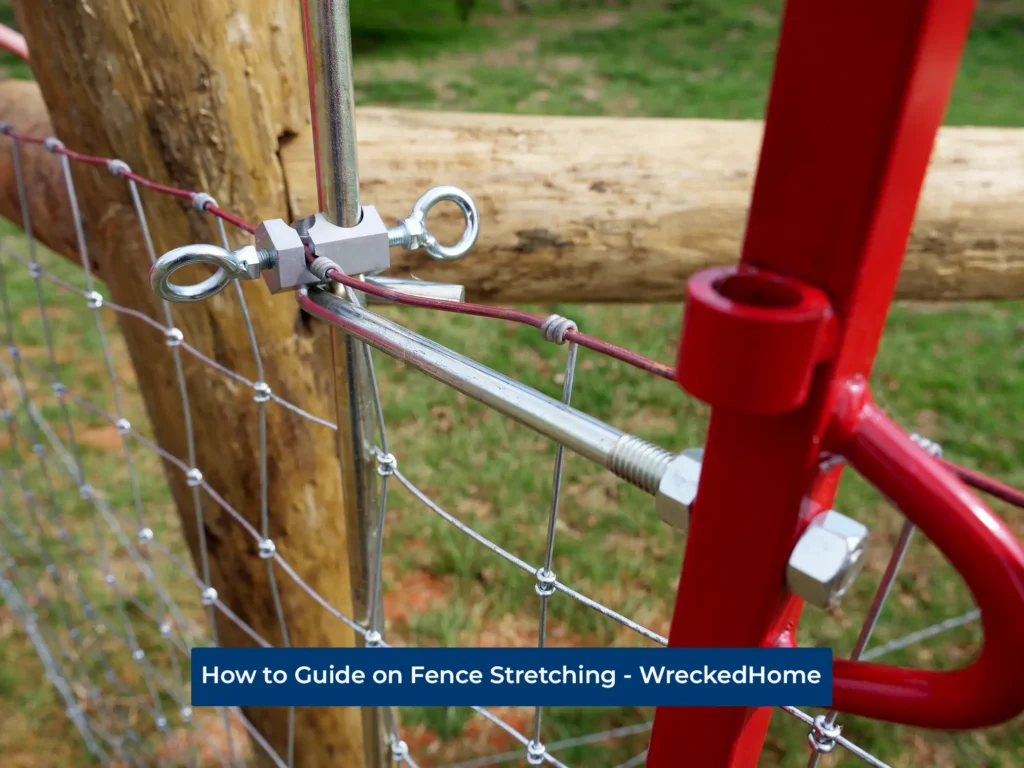
Image By: Fence Stretcher
Now, it is time for fence stretching. You need to take several steps to ensure proper fence stretching so that your project can last longer. For it, you need to take several steps:
- You need to take two wooden boards of at least 6 feet in height. These wooden boards should be 1×4 inch in size.
- Put them together. They should be stuck with each other.
- Now, drill three holes in them. They should be along the length of the boards.
- Now, put a bolt in each one and tighten it. You need to have a nut for it. In this way, a clamp is ready for you.
- Sandwich the fence between these two boards. After that, tighten the bolts. Make sure that your fence is caught tight inside the clamp. It will stretch out the fence wire evenly.
- For tightening the fence, you can use a come-along or stretch bar to make tension along the fence wire. Attach one end of them to the fence at the point where you want tension. And, attach the other end to an anchor point like a sturdy post or a tree.
- Start cranking for fence stretching. It will start applying tension to the fence. Make sure to tighten it gradually until you receive the desired level of fence stretching.
- You need to maintain the tension too. For it, use fence pliers to attach tension bars and bands to it. It will keep the tension to the desired level.
- Repeat it across all the posts so that your fence is stiff from every place.
- In the end, ensure that the fence is leveled properly. All parts of it should be aligned together. If they are not, you can lose or tighten the specific part of the fence by repeating the steps.
You should make sure that the area around your fence is clean. Make sure there is no debris or hurdles there because it can interfere with your fence stretching.
Note: Almost 50 percent of the crimp should be removed from your fence. It indicates good tension in your fence.
The clamp and stretch bar ensure that the fence stretching is even throughout the project. After that, you need to splice your fence.
By the way, you also should have knowledge on how to fill gaps under vinyl fences. This is as important as fence stretching. So, read the guide here.
Screwing T-post Clips
Now, you have done the twisting of the wire around the fence. You have wrapped the corners around the post and have done fence stretching. So, what is left now?
The last step is to fasten T-post clips. These will help the wire to be attached to the post across the height of it.
Of course, you don’t want your fence to become loose or detached from the posts, so you will use the clips. You may need 4-5 clips per post to do this job.
You need to space out the clips from the bottom-most wire. Use one clip per three to four rows of wire. You need to loop in one end of the clip on both sides of the post.
Now, use a screwdriver and wire twister to twist the clips over the wire. Now, your fence wire will remain stretched and attached to the post.
You need to repeat this step for every post. In the end, you need to take off your fence stretcher or come along. Clean out the area, and you are done with fence stretching.
For any repairs, installations, builds, or questions; We recommend you to hire a professional. Find A Pro Near You Here!
Frequently Asked Questions
How tight should the fence be?
You need to make sure that the curve, half, or bend, is stretched out from the fence wire. You should complete fence stretching while installing it.
What are the types of fences?
There are different types of fences. For example, woven wire, barbed wire, electric wire, vinyl, post and rail. You should choose from them according to your requirements. For example, if you have goats or small horses, a woven wire fence will be the best. So, you need to do proper research before choosing the type of fence.
Thumbnail By: preformed.com


