
Do you want to attach an outdoor kitchen to you concrete slab in your back yard? Are you planning to DIY a backyard pergola or want to attach something similar to your concrete?
If you said yes to any of these questions, then you should learn more about the concrete wedge anchors. It is one of the most important tools used when installing any type of material to concrete. In this informative guide, we are going to discuss this tool in great detail along with its installation process of concrete wedge anchors.
What is a Concrete Wedge Anchor?
“Wedge anchor” is a general term that is used for every type of concrete wedge anchors. It is used to install a variety of different things on concrete.
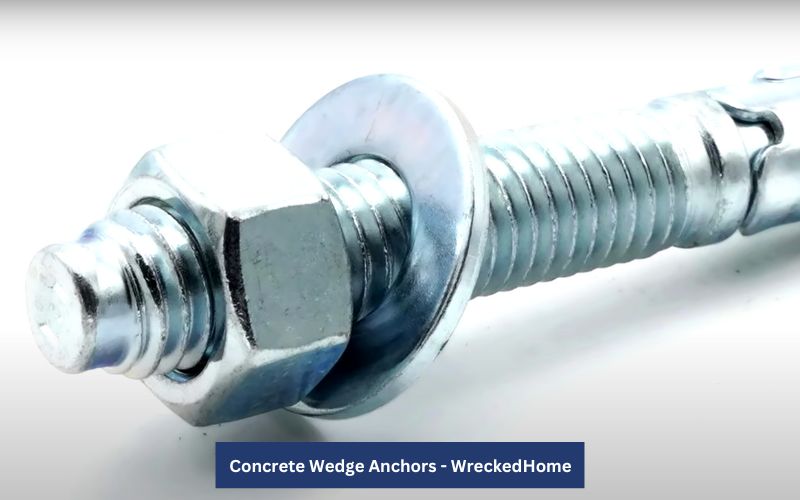
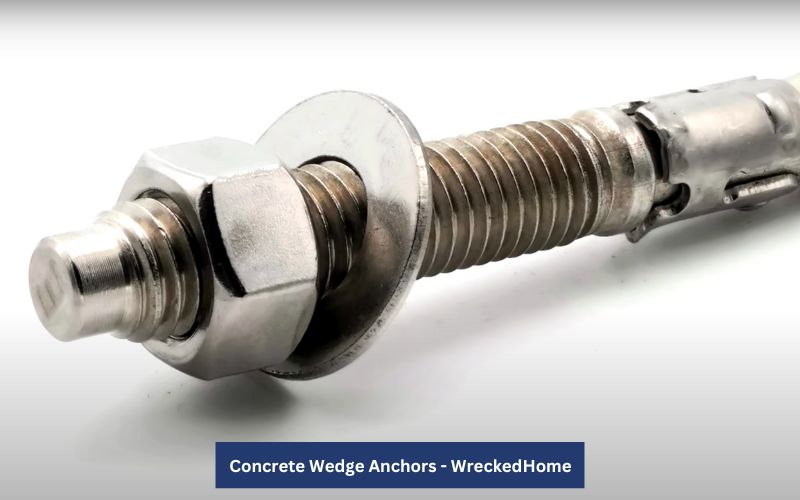
It is a screw like piece that is mostly made of stainless steel. It is threaded from one side and has a clip on the other one. You will find different nuts and washers on the whole body of it.
You can’t use it on brick or any other construction material. They are present in various sizes and made of a variety of materials.
They are available in nine different diameters and each one is present in different lengths. The range of diameters is ¼ inch to 1-¼ inch. For ¼ inch, the common length of the wedge anchor is 1-¾ inch. Moreover, for a diameter larger than ½ inch, the common length is 12 inches.
There are different companies that make these anchors. They have given different names to this tool such as Lightning Bolt. But, all of them are pretty much identical and made of the same material.
They are also ideal to use indoors where no moisture or chemicals are present. But, for outdoor projects, you can use hot dipped galvanized anchors.
The concrete anchor has four parts:
- Anchor Body: It is made from carbon steel or stainless steel. It is threaded on one end and has a cone shaped diameter on the other one.
- Expansion Clip: It is attached to the anchor body through the necked down area.
- Nut: The nut in the concrete wedge anchors is a standard national coarse hex nut. It is either stainless steel, carbon steel, or zinc-plated.
- Washer: The washer is an SAE standard one.
They are available in different types of materials.
Materials used
These wedge anchors are available in three major materials with different coatings.
- Carbon Steel: This concrete anchor comes in two different coatings. They are either zinc coated so you can use them indoors, or have a hot galvanized coating for outdoors.
- Stainless Steel 303/304: Different manufacturers either prefer stainless steel 303 or 304 in their wedge anchors. This material is ideal to use in places where moisture is present or the project is submerged in the water.
- Stainless Steel 316: It is the highest grade of stainless steel and wedge anchors made of this material are ideal for different submerged applications. It is also used in those areas where chemicals are present.
So, the different materials are also used for various purposes. Now, where can you use the wedge anchor? Let’s see the answer.
Where to use the Concrete Anchors?
This anchor is used on concrete walls and floors where things need to be in place for a long time without getting loosened.
You can use them in various small or large projects. For example, you can use them to fasten a structural steel like column anchorage and beam.
You can also use them for tightening facades and different mechanical and electronic equipment. Moreover, a wedge anchor can also be used in fastening cable trays or pipe supports. Also, you can install handrails and fire sprinkles into the concrete surface with the help of this tool.
Some other daily-life examples of its usage are mounting signs onto walls and hanging lights from ceilings. You can also use this tool in installing shelves and cabinets and securing door frames to floors.
So, how do you install a concrete anchors?
Selecting the Right Wedge Anchor
The first step in installing a concrete anchor is to find its diameter. You can find it after considering these aspects:
- The weight of the object you are going to install.
- The diameter of the hole in that object.
- Any specifications recommended by the engineer.
Now, you have an anchor of the right diameter for your project. By the way, there is a rule in the carpentry world. The larger the diameter, the larger the holding power. Remember this rule while selecting the diameter of your wedge anchor.
After finding the diameter, it is time to find the length of the wedge anchor. For this, you should consider these aspects:
- Thickness of the material you are going to fasten.
- Embedment depth of the wedge anchor.
You should know the minimum embedment depth so your concrete wedge anchors has at least the minimum holding value. In this way, it can hold the material together for a long time.
This means the final formula for finding the length of the wedge anchor is:
Minimum embedment depth of the concrete wedge + thickness of the material you are going to install + thickness of the washer and nut.
But, what is the embedment depth of your wedge anchor? To know, have a look at this table:
Visit our store for 10% off our Tools here.
| Diameter | Embedment |
| ⅜ inch | 1 ½ inch |
| ½ inch | 2 ¼ inch |
| ⅝ inch | 2 ¾ inch |
| ¾ inch | 3 ¼ inch |
| ⅞ inch | 3 ⅞ inch |
| 1 inch | 4 ½ inch |
| 1 ¼ inch | 5 ½ inch |
Now that you have chosen the right anchor, it is time to install it.
Installation Process of the Concrete Wedge Anchor
The process of installing the anchor is literally a cakewalk. You just need to follow all these steps with precautions.
1. Drilling the Hole
The first step is to drill a hole in the concrete. This step requires a lot of precautions. Because your whole time and project will get wasted if the quality of the hole is not good.
You need to remember all these instructions while installing the drill holes.
- First of all, take a hammer drill. You need to make sure that it is in the hammer and rotation mode.
- You need to use a carbide bit in installing your hole. This bit should meet the ASNI standards. So, it will drill the hole with precision.
- The main aspect you need to consider is the hole’s diameter. It should be equal to the diameter of your wedge anchor. For example, if your anchor is ½ inch, your hole should also be ½ inch in diameter.
- Now, you need to consider the length of the hole too. It should be ½ inch more than the length of the wedge anchor. This will ensure that your anchor doesn’t penetrate out of the concrete.
- Your bit’s diameter should be similar to the anchor’s diameter.
- You need to adjust the depth of the bit. To do this task, you can use a depth gauge on the hammer drill. Or, you can also use the tape on the bit where you want the hole to end.
- When you drill the hole, you should clear all the dust from it. Also, use an air compressor in the hole to take out the dust from it.
You should take care of all of these aspects while drilling the hole.
Note: Never use the standard rotation drill for drilling holes for the concrete wedge anchor. The hole will not be able to tolerate the wedge anchor, causing issues for your project.
2. Inserting the Wedge Anchor in the Hole
You can insert the anchor either directly in the concrete or through the fixture. So, we are going to discuss the method for both of them.
Insert Directly in the Concrete
Take your wedge anchor. Before inserting it in the hole, you need to put the nut on the threaded end of it. This will ensure that your anchor remains safe while hammering.
Put the expansion clip into the hole first. Then, strike the nuts with the hammer until the five to six threads are below the concrete surface.
Now, tighten the nut by using your fingers. In the end, use a wrench to turn the nut in the clockwise direction. Do it three to four times.
This process will ensure that your wedge anchor remains in place for a long time.
Insert Through the Fixture
This process is also similar to inserting the wedge anchor in the concrete. The hole will be in the concrete surface for this process too.
The difference is you have to put the fixture in the hole. Then, you should put the wedge anchor on the fixture and hammer it just like you did in the previous method.
With this, the unique thing you have to consider is the diameter of the fixture’s hole. This hole’s diameter should be larger than the wedge anchor’s diameter.
For example, if your wedge anchor’s size is ⅜ inch, the fixture hole’s diameter should be 7/16 inch.
So, this concluded the whole process of installing the wedge anchor.
For any repairs, installations, builds, or questions; We recommend you to hire a professional. Find A Pro Near You Here!
Frequently Asked Questions
What are the Benefits of the Wedge Anchor?
It is popular among people because it has rust-resistant properties, and can handle tension and shear forces. So, they can be used in outdoor applications. Moreover, they are ideal for use in heavy projects. You can use it to join window frames or big wall decorations.
What is the alternative to the Wedge Anchors?
If you don’t have the wedge anchor, you can use the hammer set in its place. They are also known as nail anchors, and they are best used in the solid concrete. The only difference between these two is that the bolt of the hammer set is not threaded.
Do Wedge Anchors Rust?
Yes, they can rust. When you use stainless steel 316 in the outdoor application, it can face corrosion and rust. But, you don’t need to worry. This corrosion will not affect its holding values.


