Micrometers, or micrometer calipers, are length-measuring instruments widely used due to their precision and accuracy. Their least count is 0.01mm or 0.001 inches. Unlike traditional measuring instruments, micrometers obtain measurements with a high degree of precision that is unattainable with other common means. That is why they are used in fields like scientific research and engineering, where a slight difference in measurements can make a big difference. Let’s explore how you can read a micrometer
Though they are used commonly, not all people know how to operate and read them. If you are one of them, you have come to the right place. In this ‘how to read a micrometer’ guide, you will learn everything you need to know to use a micrometer like a pro. Let’s get started!
Components of a Micrometer
Before we delve into the steps of how to read a micrometer, let’s understand its components.
A micrometer consists of numerous elements, each playing a different role in finding the accurate measurement. Its main components include:
- Frame: It is a U-shaped structure that holds all instrument components together and offers stability.
- Anvil: It is an immobile measuring face of a micrometer attached to the frame’s inner side. One side of the object to be measured is placed against it.
- Spindle: This cylindrical structure functions like the anvil in holding the object being measured. However, what sets it apart is its mobility. It moves towards or away from the anvil when we turn thimble.
- Sleeve: It is a stationary part that houses the spindle. It has the main scale, also called the primary scale, which establishes the initial position for measurement. It can be in millimeters, inches, or both.
- Thimble: It is the outer part that rotates and makes the spindle move, allowing you to find the thickness or length of an object. It has a secondary scale engraved around its perimeter. Unlike the primary scale, it has finer divisions.
- Lock-nut: You can tighten the lock-nut to prevent accidental spindle movement once you have obtained the measurement.
- Ratchet stop: It is located at the end of the handle and used to prevent over-tightening of the spindle around an object.
Types of Micrometers
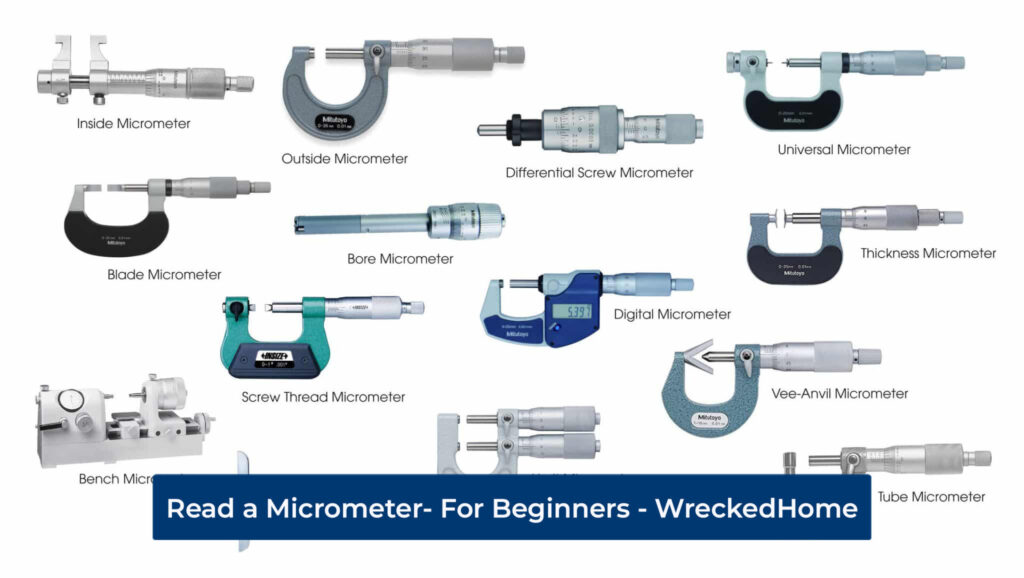
Micrometers are divided into the following main types based on their purpose of use.
- Outside micrometer: As the name suggests, it is used to measure the external dimensions of an object.
- Inside micrometer: It is used to measure the internal dimensions of an object, such as the diameters of holes.
- Depth micrometer: This tool measures the depths of grooves or holes in an object.
Visit our store for 10% off our Tools here.
Pre-reading Preparation
Understanding how to read a micrometer is the foundation for obtaining reliable measurements of wires or other small object. It is essential to make the following pre-reading preparations to get accurate results.
Ensure the instrument is clean
Measuring faces and scales of the micrometer should be entirely clean. Anything attached to these surfaces can impact the accuracy of your measurements.
Examine the micrometer thoroughly before using it. Get a clean cloth and wipe the tool gently to remove dirt or debris. Once you have used it, keep it in a protective case to prevent dust accumulation.
Zero the micrometer
Before you start taking measurements, it is crucial to zero the instrument. It is done to set the tool to zero when no object is being measured.
Clean the micrometer and then close it without applying excessive pressure. Bend the zero adjust screw to ensure the main scale zero aligns with the reference point. Repeat the process to set the zero setting.
Use the correct unit of measurement
Determine which units are used for your micrometer’s scale. Some tools may have readings in two units. Choose the most suitable unit and stick to it throughout the measurement to ensure you don’t get confused and achieve the correct results.
Step-by-step Guide to Reading an Outside Micrometer (mm)
Now that we’ve covered the basics let’s explore the details of how to read a micrometer accurately.
- Position the object: Hold the micrometer in one hand and place the object against the anvil without applying force.
- Close the spindle: Turn the thimble clockwise to make the spindle move towards the anvil. Keep doing it until the spindle touches the object’s outer surface, and you hear or feel three distinct clicks on the ratchet.
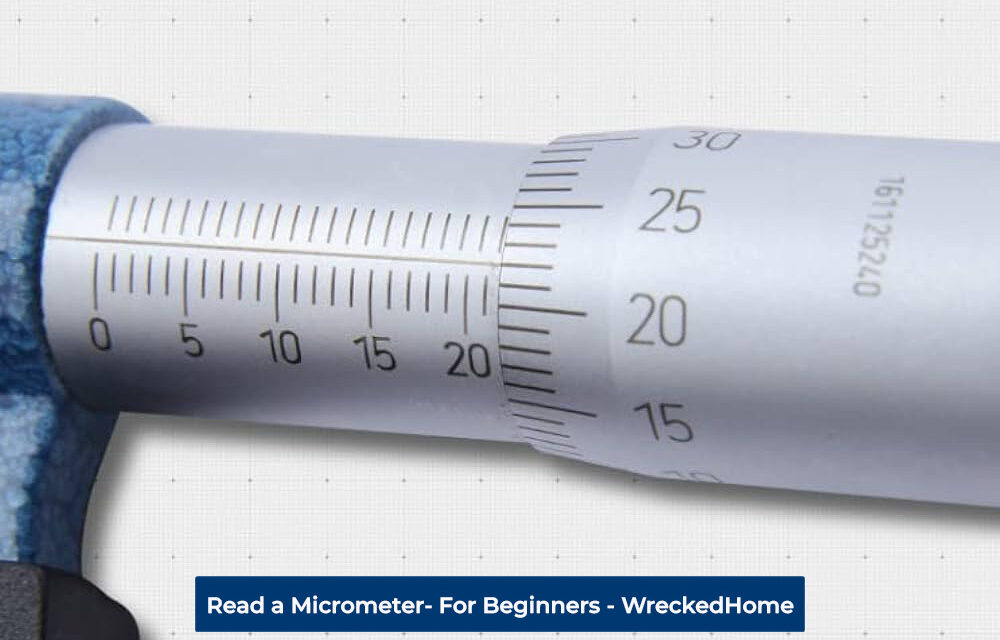
- Read the primary scale: Note down the whole number written on the main scale to the left of the thimble. Let’s say it is 2mm. Notice the markings below the central horizontal line. These are half-millimeter lines. After a whole number, check if a half-millimeter line is visible.
If you can clearly see a half-millimeter line after a whole number marking, record it as your next measurement number. Let’s say there is one half-millimeter (0.5mm) line after the whole number. So, the first part of the measurement will be 2 + 0.5 = 2.5mm.
- Read the secondary scale: Now move to the next part of the measurement. Find the whole number on the secondary scale that coincides with the horizontal line of the primary scale. Let’s say it is 31. Hence, 0.31mm is your secondary scale measurement.
- Combine both readings: Add both measurements. So, your final reading will be 2.5 + 0.31 = 2.81mm.
- Take multiple readings: It is best to take multiple readings and then get their average to increase your confidence in your answer and have a more accurate result.
Now that you have learned how to read a micrometer, you can take precise measurements confidently!
Expert Tips for an Accurate Measurement
Using a micrometer accurately requires attention to detail and proper technique. Follow these tips to use the tool like a pro and get excellent results.
- Apply minimal pressure: Use a gentle force when closing the instrument; otherwise, you may damage the measuring faces.
- Ditch parallax error: This error occurs when you note down a reading while viewing it from a wrong angle. You can avoid this issue by keeping your line of sight perpendicular to the micrometer’s scale.
- Read both scales carefully: Get the final value by recording and adding readings of both scales.
- Record the readings: Instead of trying to memorize readings, note them down on a paper immediately to prevent errors that may occur if you forget a reading.
Digital Micrometer
Unlike other tools, a digital micrometer is an advanced form of micrometer that comes with beneficial features that are not available in traditional micrometers. It is electronically generated and has an LCD screen that displays the measurement, saving you the hassle of manually recording and adding different readings to get final results.
Benefits
The advantages of using a digital micrometer extend beyond its digital display, as it simplifies the process of how to read a micrometer.
- More accurate measurements: These micrometers provide better results as their least count is 0.001 mm or 0.0001 inches, which makes them well-suited for precision work.
- Consistency: When measuring the same object repeatedly, a digital micrometer provides nearly identical readings, increasing your confidence in your readings and results.
- Low risk of reading errors: Digital micrometers are user-friendly as they provide answers in digits displayed on a screen. You do not really have to use different scales and add their values to get a final answer. The tool will do all that for you.
- Save time: It is needless to say, digital micrometers save time by automatically adding measurements and reducing the chance of error. They typically have a zero-set button that sets the tool to zero after every measurement.
- Unit conversion: With this tool, you can take measurements in both metric and imperial units. Additionally, you can convert the value written in one unit to another according to your needs.
- Data output: Data transfer is another worth-mentioning feature that some digital micrometers offer. You can share your measurements on a computer screen by wirelessly connecting it to the micrometer.
How to use it?
Now that you are already familiar with how to read a micrometer using an analog model, it will be much easier for you to learn how to use a digital micrometer.
- Zero the micrometer: Close the micrometer gently without placing any object between the anvil and spindle. Press the reset button to set the display to zero.
- Prepare the object: Clean the object to ensure it is free of dirt or debris. Align it in between the anvil and spindle.
- Take the measurement: Turn the thimble clockwise to tighten the spindle and anvil on both sides of the object. Do not use extensive force, as it can lead to inaccurate measurements.
- Record values: Note down the values displayed on the screen.
- Zero reset: Now that you have taken the desired measurement, reset the tool to zero with the help of the reset button. This ensures the micrometer is ready for the next measurement. If you use it often, it is essential to periodically calibrate it to maintain its accuracy.
Conclusion – How to Read a Micrometer?
Learning how to read a micrometer is essential for beginners, technicians, and scientists who use this tool every other day. You should start with understanding micrometer components and their roles. With practice and attention to detail, you will eventually learn to take micrometer measurements like experts.
For any repairs, installations, builds, or questions; We recommend you to hire a professional. Find A Pro Near You Here!


